
ControlUp v8.6.5 has an Azure Virtual Desktop (AVD) integration that provides some amazing metrics pulled directly from Azure. This can have a profound impact on the cost of your Microsoft Azure environment, especially if you have pay-as-you-go licensing. Let’s go over what you can do with ControlUp Automate, Microsoft Azure, Azure Virtual Desktop, and the benefits of its combo knockout technological punch!
ControlUp Automate
ControlUp Automate is an expansive solution designed to automatically execute actions. The capabilities of Automate have grown over time; originally, its capabilities included triggering actions based on state changes. For instance, you could create a trigger to execute an action when the CPU of a machine went above 50 percent for at least three seconds. This triggering system was great because it meant actions would be executed in response to something that occurred in your environment.
ControlUp then expanded the capabilities of the state trigger system to include scheduled triggers. Unlike state change-based triggers, these operate on a schedule and perform simple metric checks to see if a specified value is over whatever threshold you’ve specified. This new trigger type is amazing because you can use it to level-set your environment or execute actions based on the properties of a monitored resource. Instead of relying on state changes we can just do simple logic. At 8:00 p.m., if the number of users equals zero, shut down the machine.
Let’s Automate!
There are four things you need before you can set up Azure automation in ControlUp:
- An Azure Service principal object with rights to execute administrative actions
- A user or service account
- The user or service account user profile created on each ControlUp Monitor server
- An Azure credential file saved into the user profile of the user or service account on the ControlUp Monitor servers
Microsoft Azure Service Principal
The first thing we need to do is set up our script actions for automation. To execute automation against Azure, we need a service principal. The steps for creating a service principal can be found in our knowledge base: “Part 1 – Configure Azure App Registration and Service Principal Object for ControlUp Script Actions”
Domain Service Account
Next is a user / service account. For the purposes of this article, I’ve created an account named “svc_controlup.” This account needs to be added to the ControlUp Shared Credential Store. Select the “Settings” tab along the top of the ControlUp Real-Time Console and click on “Monitors.”
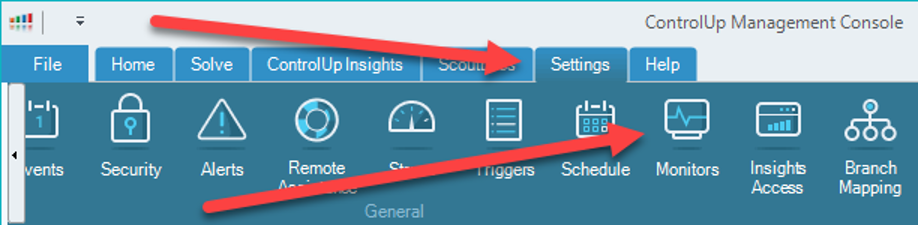
Inside the “Manage ControlUp Monitors” settings preference pane, click on “Monitors” in the Settings menu.

Click on “Add Credentials Set”

Enter your username / password and check the “Share credentials with authorized users” box.
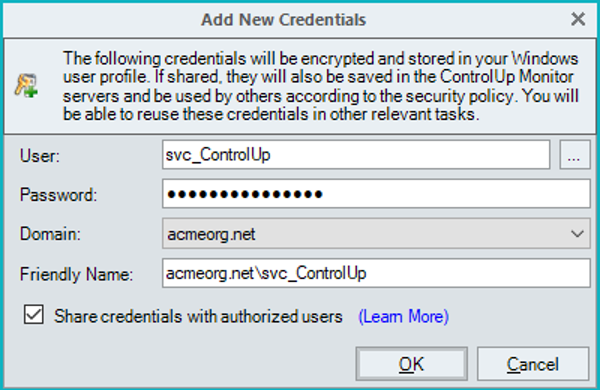
With your account selected, click “Validate.”


Set up a user profile on each ControlUp Monitor server
We need to set up each ControlUp Monitor server with the user account and Azure credential file. This needs to be done for each ControlUp Monitor Server, since the ControlUp Monitor Server that is currently load-balanced to monitor the Azure Cloud Connection will be the one executing the action.
For more information on the ControlUp Monitor Cluster, check out Benny Tritsch’s deep dive into the subject. By default, the ControlUp Monitor cluster will distribute the monitored resources among themselves, so setting up the user profile and credential file on each monitor will ensure that the automation will run no matter which ControlUp Monitor Server is performing the action.
Setting up a user profile is simple enough. You simply either RDP to the machine using the service account credentials or logon to the machine via the Console. If you have any policies blocking local logon for service accounts, you may need to remove them so the profile can be created (the policy can be re-applied afterward).
Microsoft Azure Credential Store File
Once you’ve logged onto the ControlUp Monitor Server using your service account, we need to create the credential store file with the Azure credentials. Download the ControlUp “Store Credentials” script to the target machine to generate the Azure credential store.
With the prompt, I’ll run the “Store Credentials” script and feed it the parameters for the Service Principal for creating the Azure credential store.

The script will tell you that it was successful in creating the credential object. The credential will be stored at C:\ProgramData\ControlUp\ScriptSupport.
With the credentials configured, it’s time to edit the Script Actions and define the service account for them to use when they are run in automation.
Enable the Automation
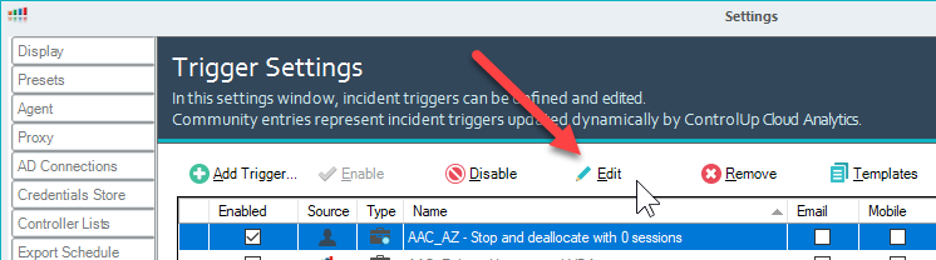
Enabling the automation within ControlUp is easy! Simply go into the Trigger Settings dialog and check each box next to the Azure automation triggers (Prefixed AAC_AZ). You will get a prompt to download the associated Script Action for each and an agreement you need to accept.

Set the service account for Script Action
Click on “Script Actions.”

With the scripts added to your organization, click on the “Organizational Scripts” tab, select one of the automation script actions, and click “Modify.”

In the dialog “Modify script action parameters,” set the “Default shared credentials for automation” to the account you defined earlier.
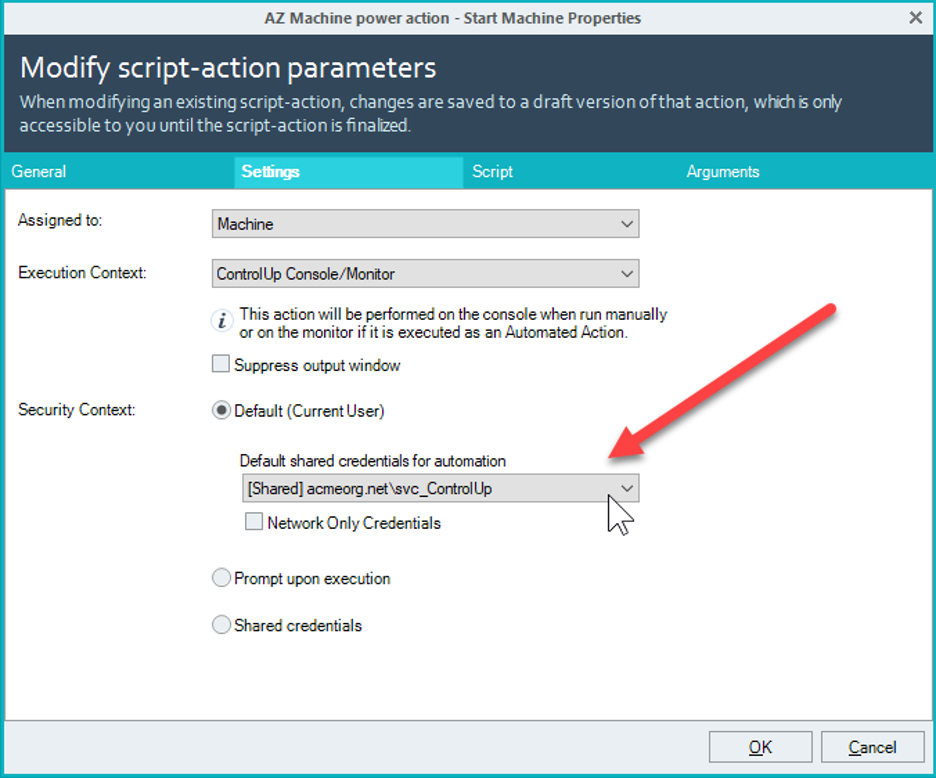
Each script action will have the same edit applied. The following Script Actions need to be modified:
AZ Machine power action: Start Machine
AZ Machine power action: Stop and deallocate
AZ Change machine disk type: StandardLRS disk
AZ Change machine disk type: StandardSSD disk
Understanding When the Automation Will Execute
This automation is relying on two different trigger types: “scheduled” and “advanced.”
An advanced trigger operates on state changes; for a deeper dive into advanced triggers, check out this video:
The scheduled trigger performs an evaluation of all resources against the filter and executes against machines that meet the filter criteria.
ControlUp offers a feature that can be assigned to a trigger called “Schedules” that defines when a trigger is active. When this comes to scheduled triggers, we can use the interval in the scheduled trigger and use schedules to define when its active interval.
If schedules are set to be active 24 / 7, then a scheduled trigger with a one-hour interval would fire 24 times in a day (once per hour).

If we attached a schedule to the scheduled trigger and define it to only operates after-hours (say 8:00 p.m.–6:00 a.m.) then the scheduled trigger would only fire in the white blocks and not the red blocks.

Advanced triggers operate similarly in that the schedules you define for them dictate when it will evaluate state changes.
If the default schedule does not work for your organization, you can adjust the schedule in the trigger.
Define a New Schedule
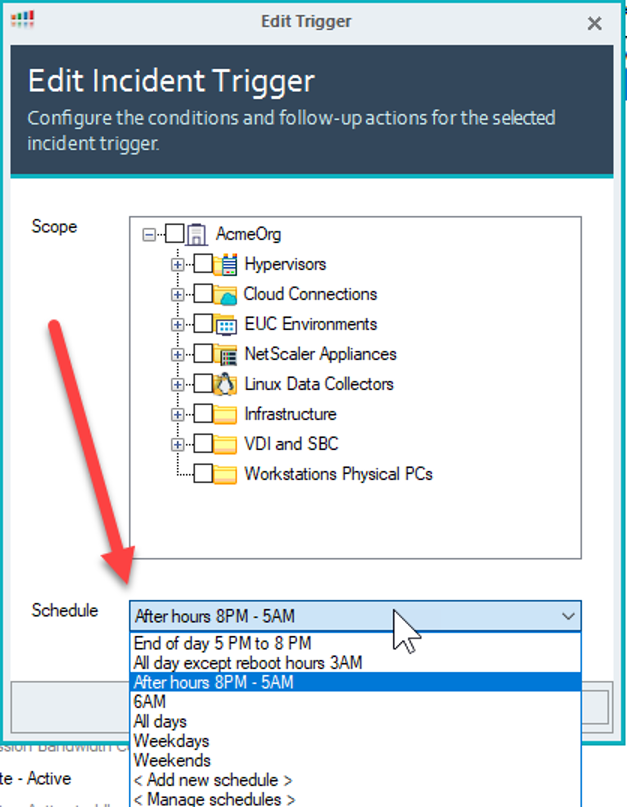
To define a different schedule for when a trigger should be active, select the trigger and click “Edit”
In the “Edit Trigger” dialog, click “Next” until you reach the “Edit Incident Trigger” portion of the wizard. At the bottom of the dialog is a schedule drop-down box; click it and a list will appear of schedules you can select. If you want to add a new schedule, simply select “Add new schedule.” If you want to edit an existing schedule, select “Manage schedules.”
For the purposes of this tutorial, select “Add new schedule.” Once you do this, the “Alert Event Schedule” dialog will appear. Here, you can give the schedule a friendly name and define when the trigger will be active.

To define when the trigger is active, select the areas in the grid where you want it to operate, then click “Record incident.” The dark blue squares in the GIF below show when the trigger will be active and the white squares when it is not.
This is an example of setting a schedule to operate only during business hours, excluding weekends.

For Azure power management features, you may want triggers to be active outside of business hours (like our blue squares or the like). Once that is complete, edit each trigger and assign your desired schedule.
For the Azure automation triggers we are providing, there are two by-default schedules: “After hours, 8:00 p.m.–5:00 a.m.” and “6:00 a.m.”. Neither distinguishes weekends from weekdays, and the trigger to schedule assignment is:

If you choose to define your own schedule, you will probably want to match or be similar to the schedules defined here.
Results of the Automation
The ControlUp audit log does an excellent job of displaying activity, including automation execution. When these automations are enabled, they record their activity, and it looks like this (read from bottom to top):

With these automations, we can see machines that are unused getting powered off, and the disk getting changed to standard HDD. Finally, around morning, we see the disk get changed back to SSD and powered back on once that disk change occurs.
From a cost standpoint, our lab at ControlUp sees a 41% reduction in costs on Azure Compute and a 33% reduction on the cost of disks in Microsoft Azure! In the example below, we’ve enabled these cost-saving automations on “WVD-POOLED-0” but have left “WVD-POOLED-1” operating 24 / 7.
