
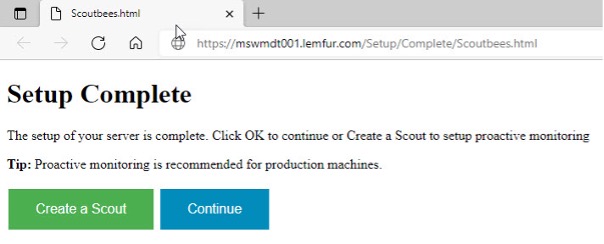
ControlUp Scoutbees is a cloud-based solution that uses continuous synthetic transaction testing to proactively alert you when the availability of your apps, desktops and network resources are impacted. Scoutbees allows IT Operations teams to quickly identify what is causing the availability issues and address them before user productivity is impacted.
From a usability standpoint, the user interface is slick and intuitive; Scoutbees is an all-around awesome product. One thing our customers have been asking us for (and that was missing in the product) was a way to integrate Scoutbees into their DevOps processes and existing internal platforms. We heard them, loud and clear, and are happy to tell you that Honeycomb, the Scoutbees API, IS HERE!
With the API, we give you the ability to not only retrieve data from Scoutbees programmatically, but also create new Scouts and edit existing ones, too. If you want to automatically create new Scouts as part of an automated server build process, no problem! If you want to provide an optional button to permit the creation of a Scout in your own web page, no problem! Do you want to display some of the test results from Scoutbees on your own internal site? No problem!
The Scoutbees Honeycomb API gives you access to pretty much all the features you can use in the service and lets you extend them for use in your own applications. It strives to be RESTful and is organized around the main resources you would be interacting with, such as Scouts, Tests, and Hives. If you can dream it, you can pretty much do it. 😊
Enough discussion. How about we try it out together?
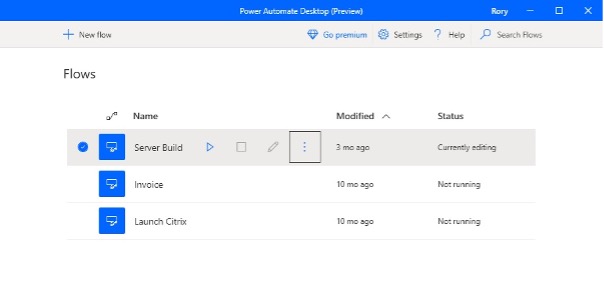
Server Build Flow in Microsoft Power Automate for Desktop
Previously, we posted a blog on building your own custom ServiceNow integration, which was a great source of inspiration for this post. If you would like to learn how to use an API it is an excellent starting point.
In this article, we’ll explore how to use the Scoutbees API in a Microsoft Power Automate Flow. The Flow in this example is building a server and in the following steps, we’ll detail adding a step to set up a Scoutbees Scout to perform continuous ping tests upon completion of the server build to ensure it is being proactively monitored right away.
TIP: To learn more about how the Scoutbees API works and how you can use it, you can reference the API documentation. This can also help you get a feel for the data you can retrieve and the actions you can perform.
Prerequisites
Before we begin, we will need an API Key in our Scoutbees account to work with.
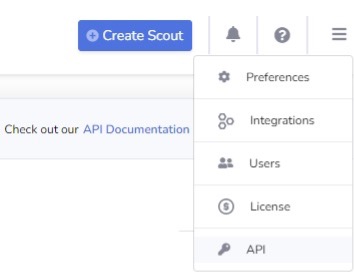
To create an API Key, simply log into Scoutbees, click on the hamburger menu and click API.
Click on the Create API Key button.
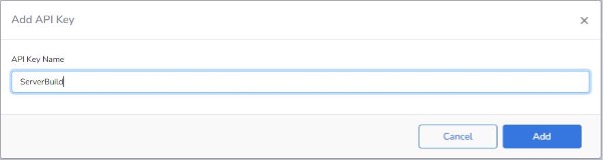
Provide your API Key an API Key Name and click Add.

Navigate to the key you just created, expand and choose to Copy API Key. You can paste that into Notepad for now, we will need it in our PowerShell script.
Building our Script
Our script is very simple. You can see how few lines are required in the above image. To explain it as simply as possible, we will go through 3 sections of the code and then in the end put them together and create our first Scout using PowerShell then we will add it to our automated server build process in Power Automate. With these steps, you can easily create your own scripts and integrate them into your DevOPs platform of choice.
- Using the API Key in a PowerShell Script
Now that we have our API key, let’s put it to work.
$headers = @{
            "x-scoutbees-key"='<APIKey>';
        }
In our script, I set a headers variable that contains my API key. This is an HTML headers section, which will be parsed when executing our code to pass the API Key so the Scoutbees service is able to authenticate and verify the key is valid and associated with our Scoutbees account. This will allow us to create our Scout.
Copy and paste the code above into the top of your PowerShell script and replace <APIKey> with the API Key you created in your Scoutbees account. Be sure to keep the single quotes around your API key.
2.) Populate Body with Scoutbees Scout Parameter
Next I set an HTML body in the PowerShell script.
$body = @{
    "address" = "SERVER01.domain.com"
    "subType" = "net_ping";
    "hive" = “eu-central-1";
    "options" = @{
        "protocol" = "ICMP";
        "payload" = 32;
    }
    "scoutName"="SERVER01.domain.com Ping";
    "interval"=5;
}
If you’re familiar with HTML, you’ll already know the tags for header and body. While a header is used for a header or sub-header section of a page, the body is usually the main section of content to be displayed on a page. In our context, the body contains the relevant parameters we want to set for our ping test.
In this example, we are creating a Scout named SERVER01.domain.com Ping which will perform a ping test to SERVER01.domain.com from our cloud hosted Scoutbees Hive in the EU every 5 minutes over the ICMP protocol.
If you would like to test from a different cloud hive, you can simply pass the name of the cloud hive you would like to test from. For example:
| Cloud Hive Location | Hive Name (API) | Cloud Service Region |
| EU (Frankfurt) | eu-central-1 | Europe (Frankfurt) |
| US East (N. Virginia) | us-east-1 | US East (N. Virginia) |
| Asia (Sydney) | ap-southeast-2 | Asia Pacific (Sydney) |
| Nordics (Oslo) | norwayeast | Norway East |
| Asia East (Hong Kong) | eastasia | East Asia |
| US West (Seattle, WA) | westus2 | West US 2 |
| South India (Chennai) | southindia | South India |
| UK (London) | eu-west-2 | Europe (London) |
| Africa (Cape-Town) | af-south-1 | Africa (Cape Town) |
| South Central US (Texas) | southcentralus | South Central US |
| Canada (Montreal) | ca-central-1 | Canada (Central) |
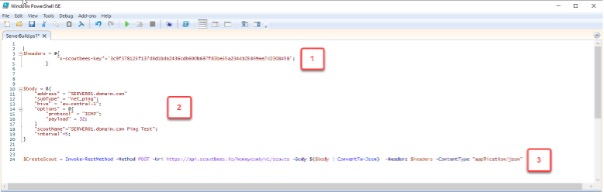
3.) Invoke-RestMethod to Create our Scout
This is the complete script to create our Scout. If you put it into your PowerShell editor of choice, input in your API key and execute it.
$headers = @{
            "x-scoutbees-key"='<APIKEY>';
        }
$body = @{
    "address" = "SERVER01.domain.com"
    "subType" = "net_ping";
    "hive" = "eu-central-1";
    "options" = @{
        "protocol" = "ICMP";
        "payload" = 32;
    }
    "scoutName"="SERVER01.domain.com Ping Test";
    "interval"=5;
}
$CreateScout = Invoke-RestMethod -Method POST -Uri https://api.scoutbees.io/honeycomb/v1/scouts -Body $($body | ConvertTo-Json)  -Headers $headers -ContentType "application/json"
We have added our final section above. I’ve broken everything down in this image, so we can see what all that’s happening:
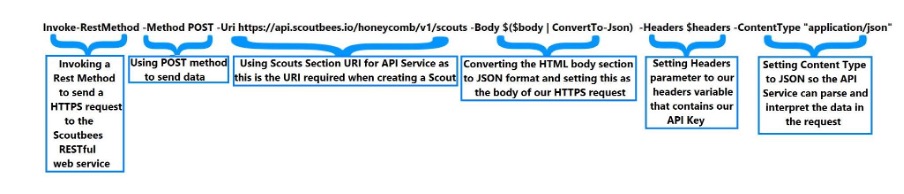
Now, put it together and what have you got? Hopefully, you have:
- A PowerShell script, structured following our API documentation
- That invokes a REST method
- Which sends a request to the Scoutbees RESTful web service
- A network Scout that will ping your server from a selected Cloud Hive
At this point, with our PowerShell script complete, we can test and run the code to confirm it works as expected.
Add the Script into a Power Automate Flow
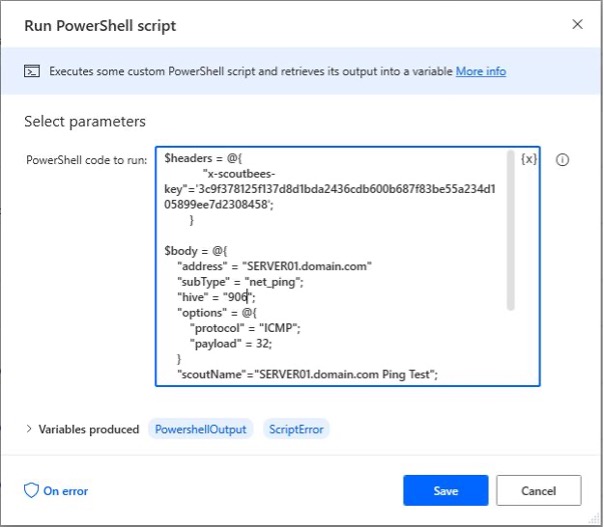
Finally, for this use case, we put a “Run PowerShell” script action into our Power Automate Flow and pasted in the script. I chose this as the last action in my flow, so it only runs when the full server build steps have completed successfully.
Option to Test from a Custom Hive
If you have an Eagle Eye, you may have noticed the script I pasted into Power Automate contained a number instead of the name of a Cloud Hive. That number is a Custom Hive ID in my organization. When building a server, it’s likely that it won’t be accessible from outside your corporate network. This is when a Custom Hive setup on a machine in your corporate network comes in handy.
If you want to test from a Custom Hive, install the agent on a Windows machine on your corporate network using these instructions.
Retrieve Your Custom Hive ID
$headers = @{
            "x-scoutbees-key"=’<APIKEY>’;
        }
#Get list of network scouts
#$body = @{
 #   "subType" = "net_ping";
#}
$scoutsQuery = Invoke-RestMethod -Method GET -Uri https://api.scoutbees.io/honeycomb/v1/hives -Body $body  -Headers $headers

if ($scoutsQuery.total_pages -ne 1) {
    ## More scouts than data returned
}

## Display list of hives
$scouts = $scoutsQuery.Data

$scouts = $scoutsQuery.Data
## Convert scouts data into objects

write-host $scouts
Input your API key into the code above and run this in PowerShell to retrieve a list of your Scouts. From the output, copy the returned id= value into your script. If you have multiple existing Custom Hives, select the id from the one you would like to use for testing, ensuring it is enabled and connected.
Now, simply modify your script and replace the Cloud Hive name with the ID number you copied and you can create a Scout that tests from a hive inside your corporate network.
Extend Your Scout
Perhaps you’d like to do more than just a ping test of your server. Maybe you would like to also setup a Scout to perform a Traceroute over port 443 for a Web Server or maybe 1433 for a SQL Server, you can simply add the following code to your script:
$headers = @{
            "x-scoutbees-key"='<APIKEY>';
        }

$body = @{
    "address" = "SERVER01.domain.com"
    "subType" = "net_traceroute";
    "hive" = "CloudHiveorCustomHiveID";
    "options" = @{
        "protocol" = "TCP";
        "port" = <portnumber>;
        "timeout" = 3.6;
        "numpaths" = 10;
    }
    "scoutName"="SERVER01.domain.com <portnumber> Test";
    "interval"=5;
}
Input your own API key, the hive you would like to use for testing, and the port number you would like to test for availability.
ControlUp Scoutbees has proven to be an invaluable tool in our customers’ toolbelt since its release. It is quite possibly the simplest enterprise product in the world to set up. In fact, you can set up Scoutbees and start using it in just over two minutes!
Hiya, #DigitalExperience fam! It's time for another episode of ControlUp #TekTok, with THE @joelinthecloud. He's got the scoop on how to get started with Scoutbees, our super-smart, SaaS-based proactive synthetic testing app: https://t.co/AzddDdtBxg #DEX #ExperienceEverywhere pic.twitter.com/JN6JimehEO
— ControlUp (@ControlUp) November 4, 2021
We hope you enjoyed this blog post and, just as I was inspired to try this after reading the ServiceNow integration blog, perhaps you will be inspired to try adding this to your automated server build process or other automation processes you use in your day to day work. Get started with ControlUp Scoutbees today!