
Being able to run scripts—manually through our Script-based Actions (SBAs) or automated through the Automated Actions feature—are two of ControlUp’s most powerful capabilities.
Not only do script-based actions allow you to simplify complex operations, they also make ControlUp extendable to platforms that are not natively integrated in the real-time console today. And using SBAs has the added benefit of agility. With an ever-changing IT landscape—even more so with cloud platforms—having the ability to quickly make changes and use new functionality makes scripting a great option.
Some examples of this are integration with an IT support ticketing platform, such as ServiceNow or Zendesk, or being able to send alerts and notifications to Slack or Microsoft Teams. Although these integrations don’t exist natively in ControlUp today, we’ve created these integrations by using the respective vendors’ REST APIs, paired with ControlUp’s Script-based Actions.
The examples used in this post show integration with ServiceNow, using their REST API. In the ControlUp EUC environment, we use the ServiceNow integration as part of an Automated Action (AA) that does the following (the examples you’ll find in this post highlighted in bold) :
- The condition used for this trigger is the Logon Duration metric (it triggers when the logon duration value is equal to or greater than 35 seconds)
- When the AA is triggered, it runs a script that contains:
- The world-famous ControlUp Analyze Logon Duration (or “ALD”) script
- Uses the ServiceNow Rest API, creates an incident in the system and uses the output from the ALD as the description
- Takes the incident Number and ID from the response header and uses that information to create a Slack notification (using Slack’s Webhook API) to a specific channel with information and a link to the created incident
This blog post will guide you through 10 simple steps on how to build your own integration in ControlUp.
The 10 Steps:
1. Check vendor API documentation
2. Validate your API calls in Postman
3. Turn the API calls into PowerShell code
4. Test in PowerShell
5. Create a ControlUp Script-Based Action
6. Import PowerShell script into the SBA
7. Test draft script as a manual action
8. Modify script to replace relevant parameter values with Arguments
9. Test draft script with arguments
10. Finalize Script (optional: submit to ControlUp community)
Bonus step: Use in an Automated Action!
Now, let’s dig a bit deeper into each of these steps.
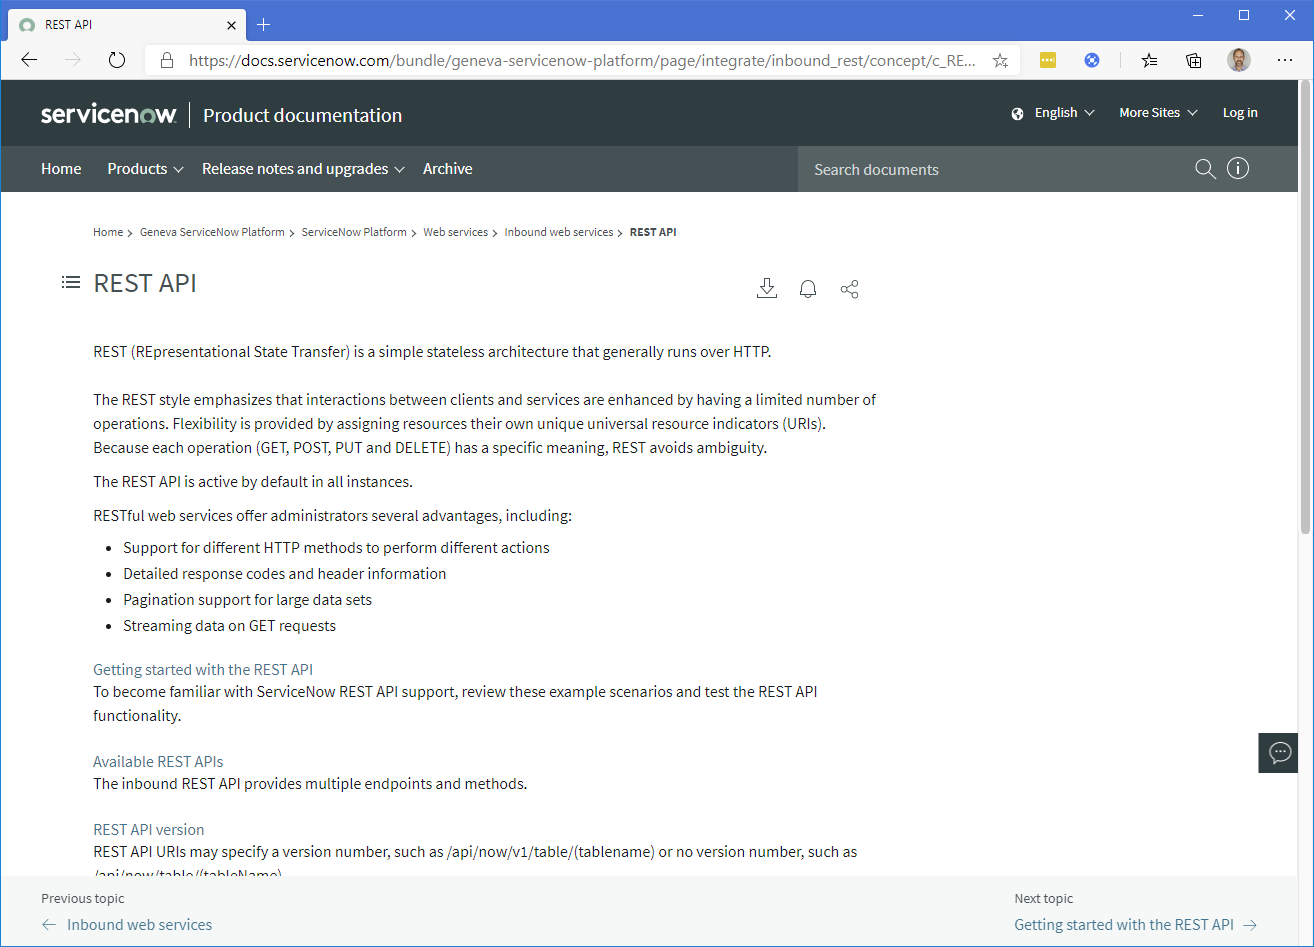
1. Check vendor API Documentation
For the platform you’re working with, start with checking out the available documentation. A quick internet search will typically get you there.
In the REST API documentation, check out the sections covering authentication and headers, as well as the particular documentation for the action you want to execute through the API (in the case of our ServiceNow example, the “create an incident record” documentation would be the relevant section).
2. Validate your API calls in Postman
Although there are other tools you can use to test the API calls you want to use (including online API testers or “API explorers” often provided by the vendor), my go-to tool is Postman.
Since this post is not about Postman, I won’t go into all its benefits, but some of the main reasons I like it are:
- Being able to save your work and sync across devices;
- The ability to store global variables;
- The Test scripts feature (e.g. for storing response headers values in global parameters for use in subsequent API calls);
- Postman Interceptor;
The ability to generate code snippets (which we will use in the next step)
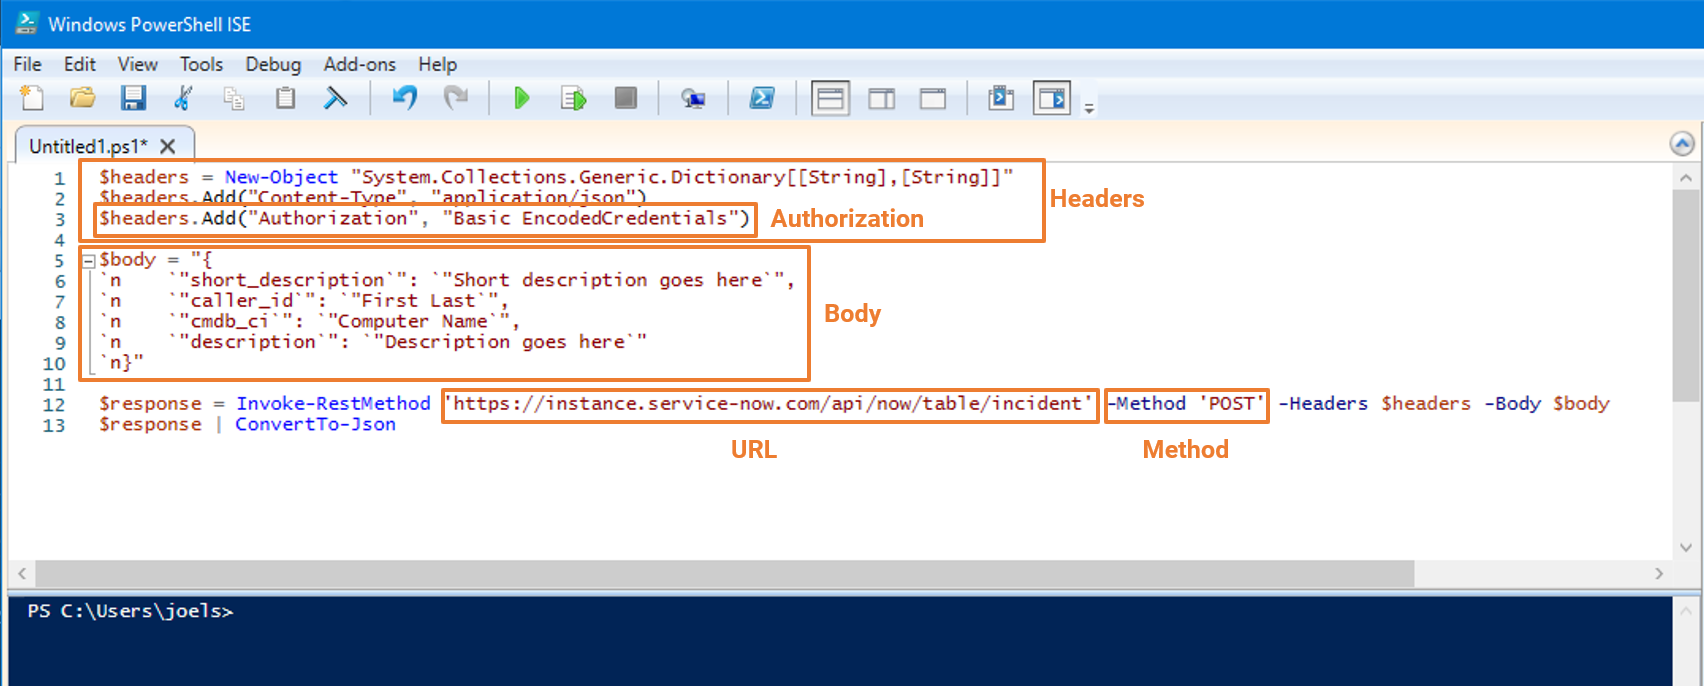
As far as validating the API calls, let’s first break down the most important elements:
- Method
- URL
- Authorization
- Headers
- Body
The Method in an API call is about the action the call performs, such as reading information from or writing information to the targeted platform. The two you will likely use the most are GET and POST. For a more detailed overview of the various methods, check out this article: https://restfulapi.net/http-methods/
In our ServiceNow example, we will use POST.
The next thing you will need is the URL, which is the destination address for your specific API call. This is usually one of the first things you see in the vendor’s documentation. In cases where you are using webhooks, the URL is often generated after configuration in the vendor’s platform (i.e. this one for Slack https://api.slack.com/messaging/webhooks#create_a_webhook).
In our ServiceNow example, for the specific call we’re making (create incident record) the URL is:
The [instance] part will be replaced with our instance id (e.g. devxxxxx).
Most importantly, make sure that you always make your API calls over an HTTPS connection. If you run into a platform that supports making API calls over HTTP, please step away and move on.
Using HTTPS should be standard protocol for everything these days (I don’t even visit websites that use HTTP), but especially when you’re doing authentication… which brings us to the next part.
The Authorization part of an API call is what ensures that you can actually make the call as well as make it in the correct security context (which also has relevance for audit logging).
Now, this blog post would be exponentially longer if we go into too much detail on this, so my recommendation would be to refer to the vendor’s documentation, or if you want to learn more about REST API authentication in general, check out this article on the Restcase blog.
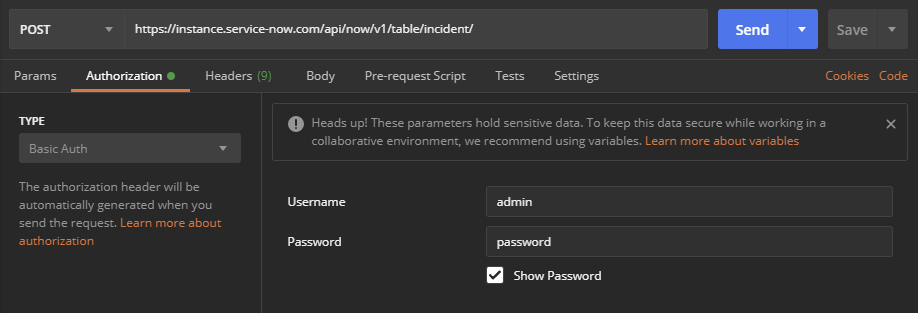
Basic authentication—using a username and password—is what I’ve seen most often “in the field,” but there are definitely platforms out there that use more advanced authentication methods, such as OAuth with bearer tokens.
With basic authentication, the credential set is usually encoded with Base64 and then embedded in the request header of the call, as you will see in our example below.
The ServiceNow API uses basic authentication with Base64 encoding for username and password. Postman has a tab for authentication and will automatically do the Base64 encoding of your credentials and put it in the Authorization request header.
I’ve seen some cases (e.g. with the Zendesk API which uses /token: for the authentication) in which the Base64 encoding in Postman goes wrong (I suspect that it has to do with the encoding of special characters, which doesn’t seem to be configurable in Postman). In those cases where you run into issues, instead of using the built-in authentication, you could encode manually (e.g. using a site like this and then adding it into the headers manually).
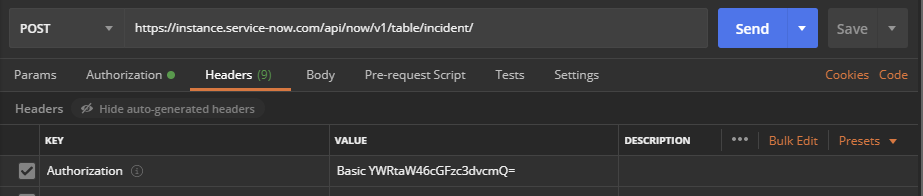
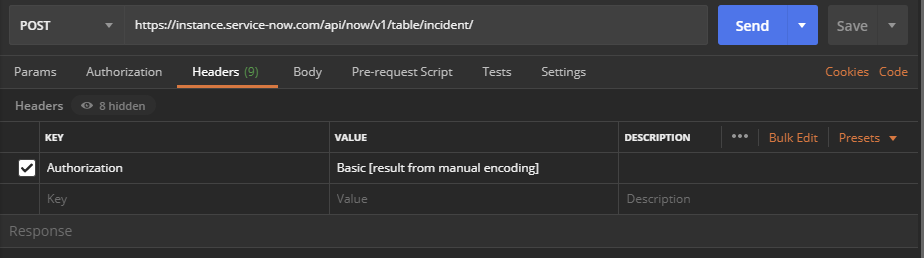
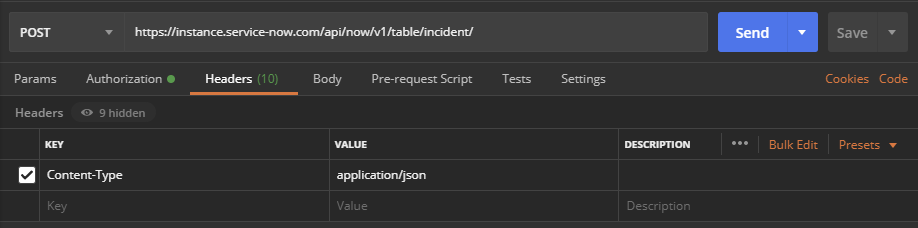
The (request) Headers of your API call contain metadata related to how your client (in this case, our eventual script) and server (the vendor’s platform) communicate with each other, the authentication piece as described above, caching information, language information, the type of content (like HTML, image, JSON) and other information related to the interaction between client and server. There are often also platform-specific headers that need to be taken into consideration, so make sure you read the relevant vendor documentation.
In my example, we will only use the Authorization header (see previous section) and the ‘application/json’ Content-Type header
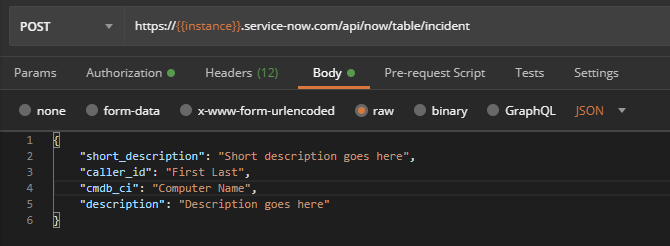
The Body of the API call usually contains the actual content we are sending over to the platform. You will see this most often used for methods that write information into the platform (like POST, PUT and PATCH).
The Body is often sent as raw JSON information and the specific formatting is normally described in the vendor documentation.

In our example, in which we create a ServiceNow incident, the body contains various pieces of information related to the incident, such as the “caller id,” the computer name, and the incident title and description. We will be using placeholder values at this stage and will replace these placeholders in step eight with actual values from within ControlUp (and in our demo environment, we actually take the output of the ALD script for the long description, but in our example here, we will keep it simple).
NOTE: the “caller_id” and computer name (cmdb_ci) values need to exist in ServiceNow already for those to be filled out (which applies to both the UI, where you need to select it from a list and programmatically through the API). In our instance, I created a caller called “First Last” and a computer called “Computer Name” to make this work, but you might see blank values in your environment.
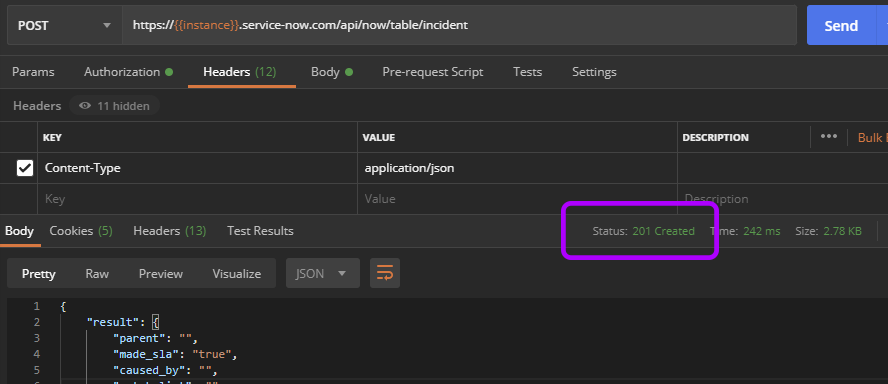
Once you have all the information you need and have tested the API call(s) using Postman, you’re ready to move things out of postman and into PowerShell.
3. Turn the API calls into PowerShell code
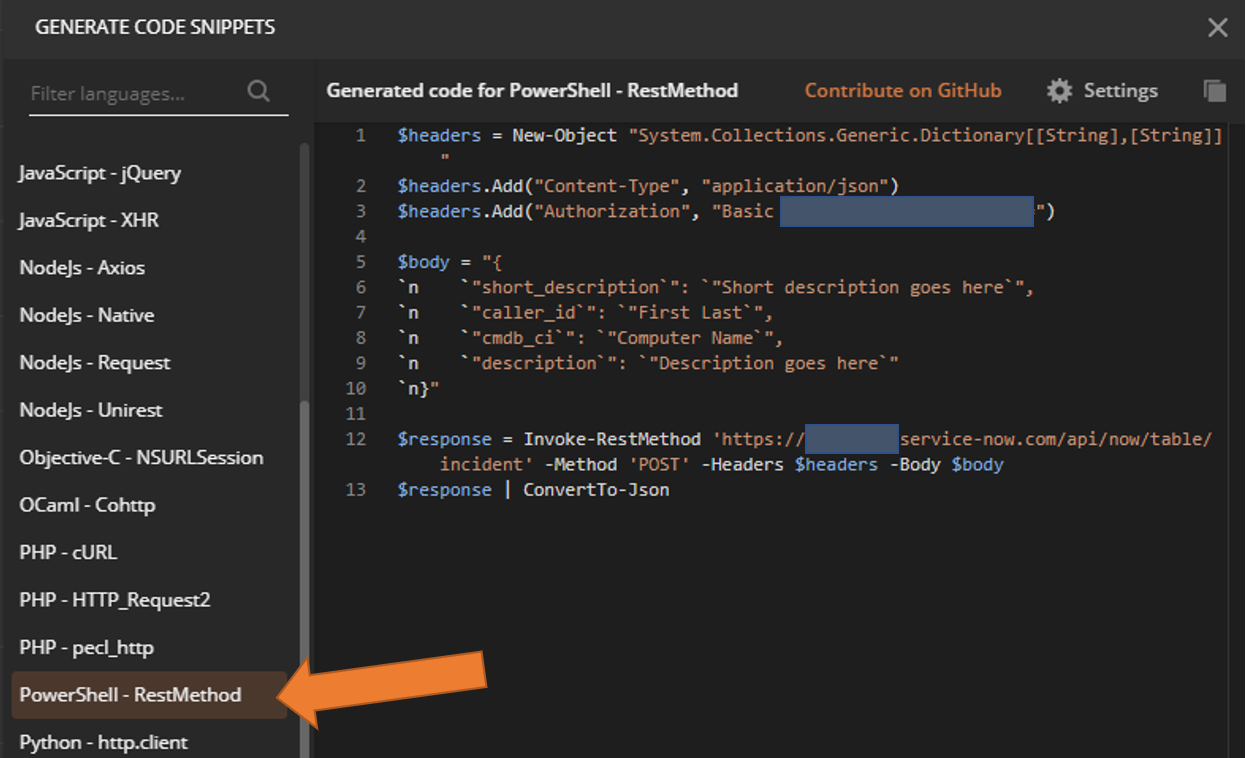
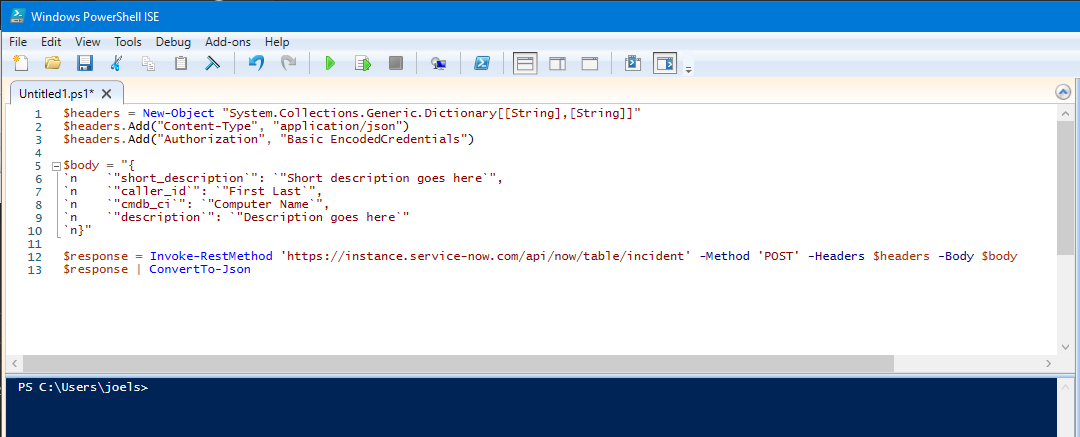
After the successful test of your API call, in Postman, go to code, select PowerShell – RestMethod from the list and copy the code to a text editor (I prefer to use Notepad++) or straight into PowerShell ISE.

Note: there are two PowerShell commands that can be used for making a REST API call. Invoke-WebRequest and Invoke-RestMethod. Although these commands perform similar actions, one of the key differences is how the Invoke-RestMethod command parses the Response Header information, which, in most cases, makes it the preferred command for communication with a REST API, especially if you want to consume information from the response header in the remainder of your script. This article goes into more detail on parsing response headers.
As you will see in the script code, it took all the information we talked about in Step 2:
As you may notice, this includes the already encoded Authorization header information. If the script was just for you, this wouldn’t be a big issue (although still not best practice), but since we are going to use this script in ControlUp and will likely be used by others we want to do three things:
- Move the encoding of the credentials to the script (in Postman this was done for you and currently it includes the already encoded credentials as Authorization header);
- Create parameters for username and password (or other types of credentials);
- Replace the username and password with parameter values using ControlUp’s Arguments.
For this step, we will just do the first two items. The last item we will do in step 8.
In my example, I will replace the Authorization header part with code that does the Base64 encoding of the username and password.
$headers = New-Object "System.Collections.Generic.Dictionary[[String],[String]]"
$headers.Add("Content-Type", "application/json")
$headers.Add("Authorization", "Basic EncodedCredentials")

$body = "{
`n `"short_description`": `"Short description goes here`",
`n `"caller_id`": `"First Last`",
`n `"cmdb_ci`": `"Computer Name`",
`n `"description`": `"Description goes here`"
`n}"

$response = Invoke-RestMethod 'https://instance.service-now.com/api/now/table/incident' -Method 'POST' -Headers $headers -Body $body
$response | ConvertTo-Json
Figure 13 – Script before changes
$username = “admin”
$password = “password”
$base64AuthInfo = [Convert]::ToBase64String([Text.Encoding]::ASCII.GetBytes(("{0}:{1}" -f $username, $password)))

$headers = New-Object "System.Collections.Generic.Dictionary[[String],[String]]"
$headers.Add("Content-Type", "application/json")
$headers.Add("Authorization", “Basic $base64AuthInfo”)

$body = "{
`n `"short_description`": `"Short description goes here`",
`n `"caller_id`": `"First Last`",
`n `"cmdb_ci`": `"Computer Name`",
`n `"description`": `"Description goes here`"
`n}"

$response = Invoke-RestMethod 'https://instance.service-now.com/api/now/table/incident' -Method 'POST' -Headers $headers -Body $body
$response | ConvertTo-Json
Figure 14 – Script after changes
Please note: it’s possible that you see code in your script related to cookies (e.g. starting with something like “$headers.Add(“Cookie”… when copying from Postman, which normally can be safely removed).
For those still with me, don’t worry, the heavy lifting is done and things get easier from here on out.

4. Test in PowerShell
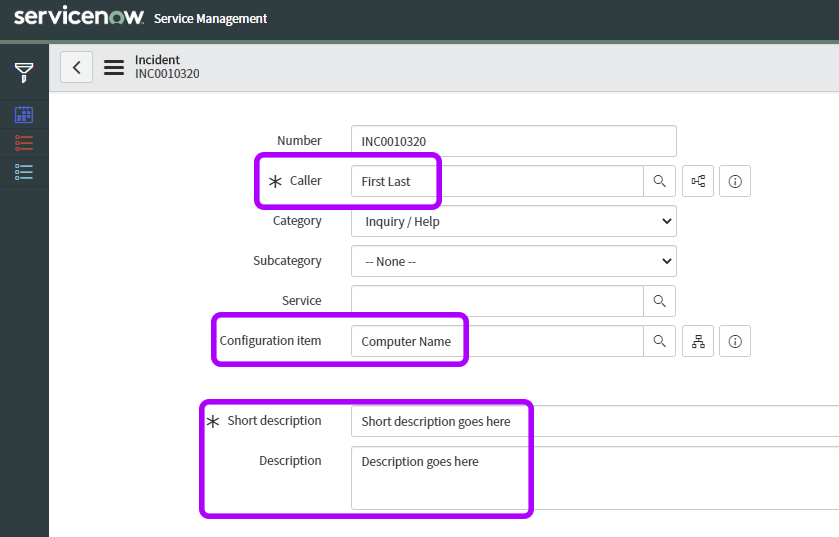
Next, run the script to make sure it runs successfully from PowerShell. Obviously, you can check the vendor platform UI to see if you were successful (as we did in Step 2), but you should also check your response headers in PowerShell.
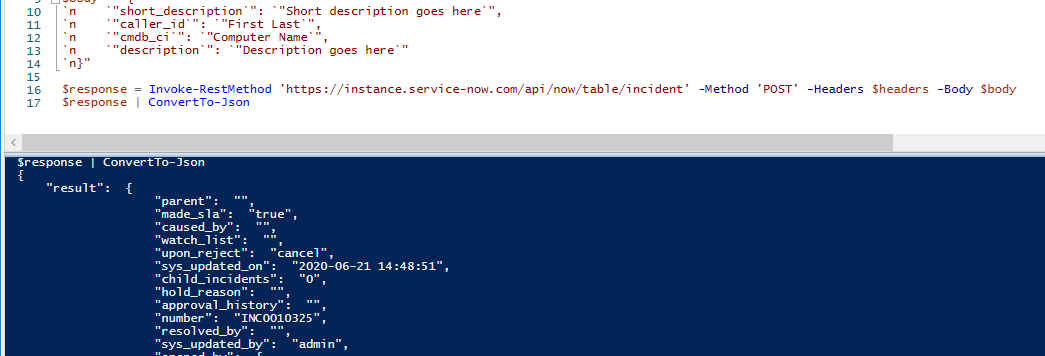
If all looks good, save the PowerShell script (.ps1) and you’re ready to move things over to ControlUp.
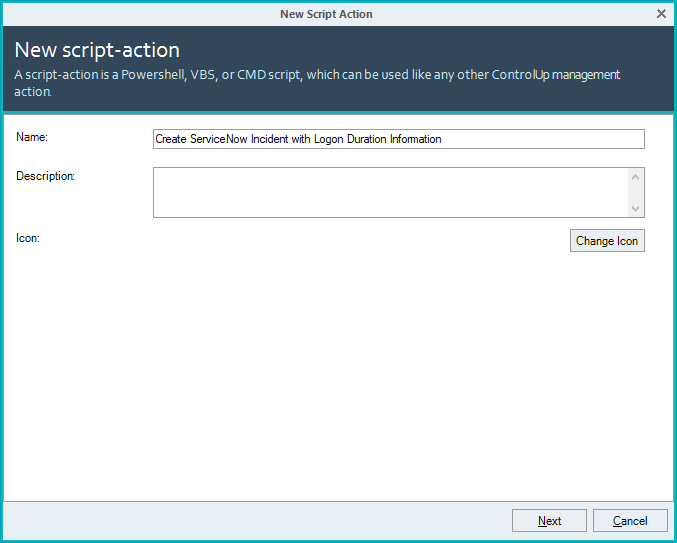
5. Create a ControlUp Script-Based Action
Take a look at the full instructions [in the ControlUp Knowledge Base] on how to do this.
For our example, we will use the following values:
Name: Create ServiceNow Incident with Logon Duration Information (first dialog)
Assigned to: Session
Execution Context: Target Machine
Security Context: Default (Local System)

6. Import PowerShell script into the SBA
When you get to the Script dialog, import the script we saved in step 4.
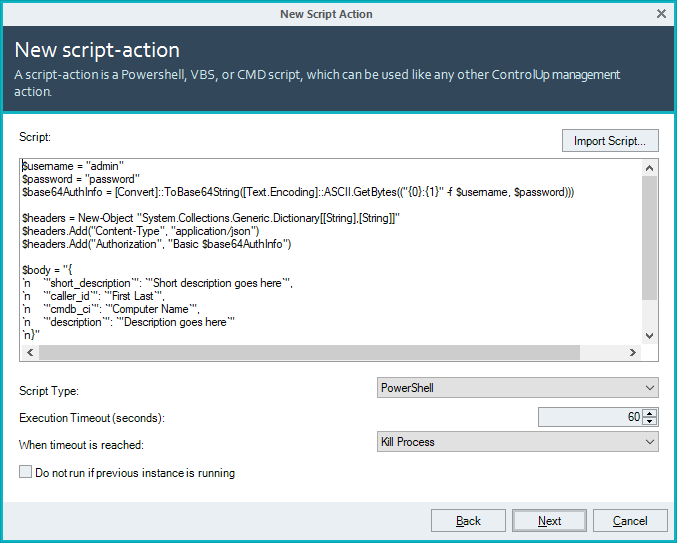
Skip filling out the Arguments dialog for now and click Finish.
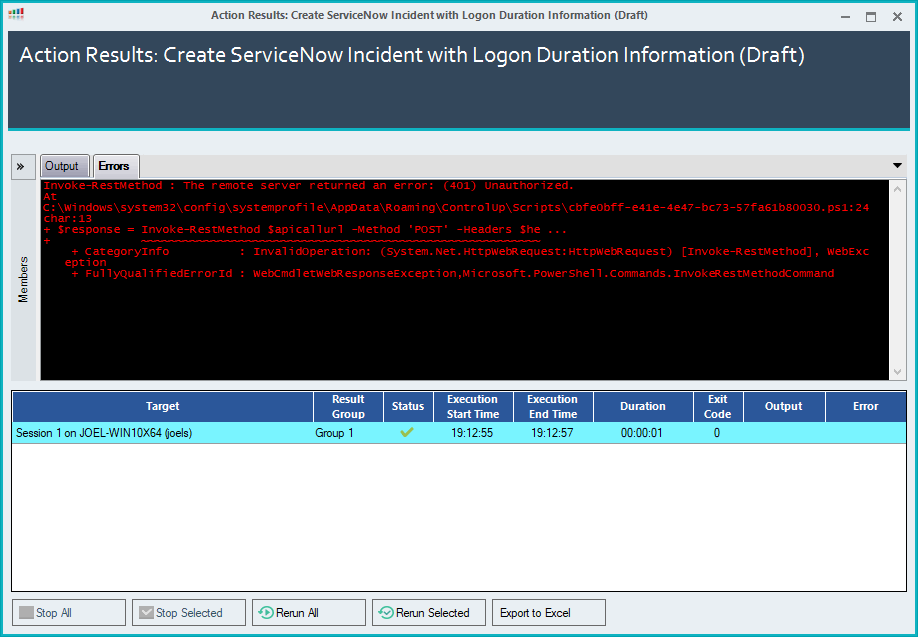
7. Test draft script as a manual action
In ControlUp, go to the Sessions view and select any of your sessions, right click, select Script Actions and select the script we created above. Since we are not using arguments yet, it doesn’t really matter what session we choose.

Validate (as we did before with testing) whether the script ran successfully, both in ServiceNow, as well as in ControlUp.

8. Modify script to replace relevant parameter values with Arguments
ControlUp’s SBA feature allows you to use metrics exposed through the Real-Time Console and use those as parameter values in a script (see the Arguments tab section). Not only can this feature make the scripts you use more dynamic (e.g. if you have a script that is designed to kill a process, you can take the specific pid (process id) from the process(es) you selected in the Real-time Console and feed those values into your script), it can also take metrics and pass it on the third-party platform, as is relevant for our example.
In addition to arguments that are collected from metrics, you can also configure arguments that take static values, either pre-populated with defaults (required for automation) or from user input (when running a script manually). Those arguments are useful for storing things like usernames and passwords, instance IDs or URLs, and other metadata.
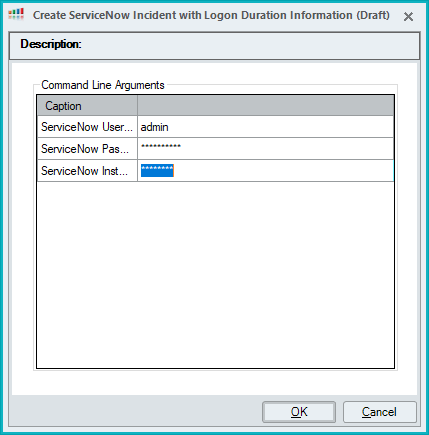
For our ServiceNow example, we will configure the following Arguments:
| Argument | Record Type | Caption | Default |
| $args[0] | Session | User Full Name | N/A |
| $args[1] | Session | Logon Duration | N/A |
| $args[2] | Machine | Name | N/A |
| $args[3] | ServiceNow Username | admin* | |
| $args[4] | ServiceNow Password | password* | |
| $args[5] | ServiceNow Instance | instance* |
*replace with your information
Once we set the arguments following the table above, we need to go back to the scripts tab and replace the static values with the arguments.
Important note: there’s an actual “right way” to do this, as described in our ControlUp Scripting Standards document in the “Script Parameter” section on pages 4 and 5.
For simplicity in this example, I’m going to take a shortcut and just pass on the arguments like this:
$caller = $args[0]
$logonduration = $args[1]
$machinename = $args[2]
$username = $args[3]
$password = $args[4]
$instanceid = $args[5]
After making some other modifications and replacing the placeholder values in the body with the new parameters, the final script looks like this:
$caller = $args[0]
$logonduration = $args[1]
$machinename = $args[2]
$username = $args[3]
$password = $args[4]
$instanceid = $args[5]

# Put API Call URL in parameter consuming $instanceid from above
$apicallurl = "https://$instanceid.service-now.com/api/now/table/incident"

$base64AuthInfo = [Convert]::ToBase64String([Text.Encoding]::ASCII.GetBytes(("{0}:{1}" -f $username, $password)))

$headers = New-Object "System.Collections.Generic.Dictionary[[String],[String]]"
$headers.Add("Content-Type", "application/json")
$headers.Add("Authorization", "Basic $base64AuthInfo")

$body = "{
`n `"short_description`": `"Logon Duration Incident`",
`n `"caller_id`": '$caller',
`n `"cmdb_ci`": '$machinename',
`n `"description`": `"User's Logon Duration was $logonduration seconds`"
`n}"

$response = Invoke-RestMethod $apicallurl -Method 'POST' -Headers $headers -Body $body
$response | ConvertTo-Json

9. Test draft script with arguments
In the ControlUp Console, from the Sessions view, find an active session to test the script on, right-click, select Script Action, find the script (Draft), and select to run it.
Since we defined three arguments that prompt for input, a dialog will pop up to enter those, but since we put default values in for those (to ensure it will also work in an Automated Action), you can just click OK.
If the script runs successfully, you can move to the next step. If not, check the Errors tab to troubleshoot and make changes where necessary. If the script worked correctly in step 7, it’s likely related to the arguments we created in step 8, so make sure your syntax is correct and that there are no typos in the username and password.

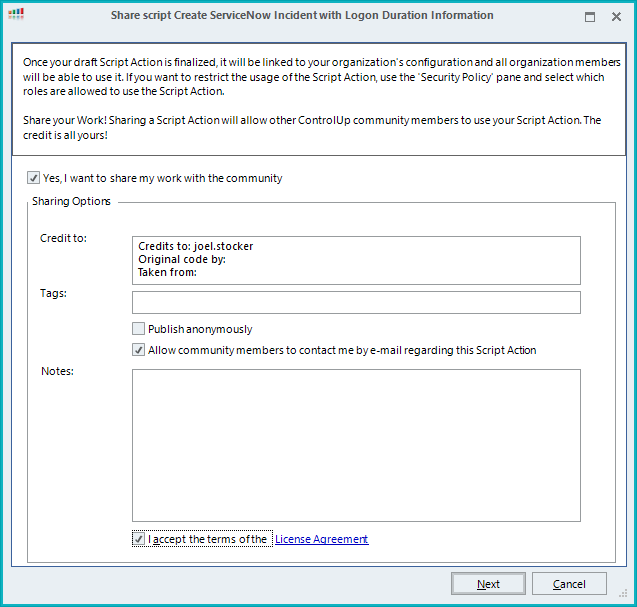
10. Finalize Script (optional: submit to ControlUp community)
Go back to Script Actions and them to the My Draft Scripts tab; select your script and click the finalize button.

If you think that your script would benefit other ControlUp community members and customers, click the checkbox for “Yes, I want to share my work with the community.” A member of the ControlUp team will reach out to you by email regarding the next steps (all community scripts we provide are vetted and tested before being released). But before you do that, make sure you remove any default Arguments values information from the script (e.g usernames, password, etc).
And that’s how it’s done. Congratulations! You have successfully built a third-party platform integration in ControlUp.
Bonus step: Use in an Automated Action
A logical next step is to make your script part of an Automated Action. This post is not going to go into that, but we have an excellent User Guide that you should check out.
To wrap up this post, I’ve created a video that shows all ten steps with our ServiceNow example in action:
This post made one big assumption, which is the availability of vendor documentation. In a future post, I’m planning to write about what to do if a vendor has no public information/API documentation and how you can “reverse engineer” things so you don’t get stuck at Step 1.
In the meantime, download ControlUp and start seeing your VDI in an entirely new light.