
With the release of Citrix XenDesktop 7.9, a new feature we’ve all been “keen as mustard” to test is the new Citrix MCS IO acceleration baked into the 7.9 release. If you’re unfamiliar with this functionality, think about the ability to serve burst disk IO directly from RAM instead of slower san disk.
Moreover, if you’re familiar with Citrix Provisioning services, this technology could be directly compared to the “kick ass” feature in Citrix Provisioning services called “Cache in RAM, Overflow to disk”.
Overview:
With Citrix XenDesktop 7.9, you have two new options for optimising and accelerating temporary data:
- Temporary Ram Cache.
- Temporary Disk Cache.
With Temporary RAM Cache, you configure a memory limit (say 256mb) and all the IO to the system up to 256mb is written directly to ram instead of disk!
With temporary disk cache, you could choose to offload the write IO to a separate volume or local SSD. Similar again to PVS write cache disks.
WARNING!
If you enable RAM cache, but don’t enable Temporary Disk Cache, the contents of RAM will never reduce and you will bluescreen your target device if your IO is greater than your RAM! E.G. if you run out of RAM, your machine goes down…
Yep you heard me right, consider this cache type the same as the old RAM cache in provisioning services. Useful, but only if you like to live dangerously or have so much RAM the concept of running out is foreign and laughable.
Similarly, if you undersize the cache disk, and the cache disk fills up, your device will “stop responding” to remote requests.
So the golden rules are:
- Never run RAM cache without disk cache unless you’re certain you will always have free RAM.
- Never run Disk Cache without properly sizing the disk to at least the free space available to the VM’s C: drive.
Consider yourself suitably warned!
Back on track!
So with the technology in hands, we dived right in to review the offering:
So I’m going to go ahead and assume you’ve upgraded your site and machines to the latest 7.9 software and VDA’s, if you haven’t, go do it now!
Configure once, never change:
TLDR: you need to create a new catalog.
First things first, unfortunately with this release, you configure your caching options when creating your machine catalogs. So if you do want to use the new caching options today, you’ll need to create new catalogs for your machines and replace the machines in your delivery groups with the new machines you provision with caching.
Adding Temporary storage:
TLDR: Use local or shared storage. Shared is faster to test.
Secondly, knowing that a RAM cache without Disk cache is a bad idea, you’ll need to create a location for your temporary storage. You can use your Shared Storage that you use today, or you can use local storage on the hypervisors.
To add local storage, you need to create new resources and migrate your existing machine catalogs to them. A royal pain in the backside for testing so I opted to NOT do that, instead I simply added my shared storage as temporary storage by editing my current connection:

and Choosing the storage as temporary as follows:

Once I’ve done that, we can get to it!
Creating a Caching Machine catalog:
TLDR: only works on Pooled desktops, can’t be used to create Appdisks
Create a Pooled, random desktop catalog as you would, but ensure to set the VDA to the latest version:
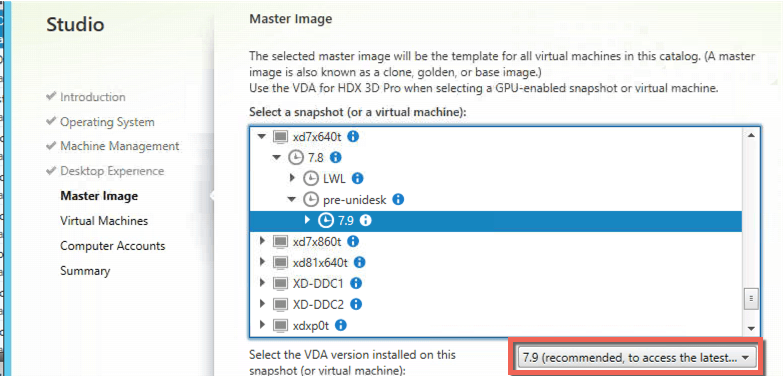
On the next page, you get the good stuff!
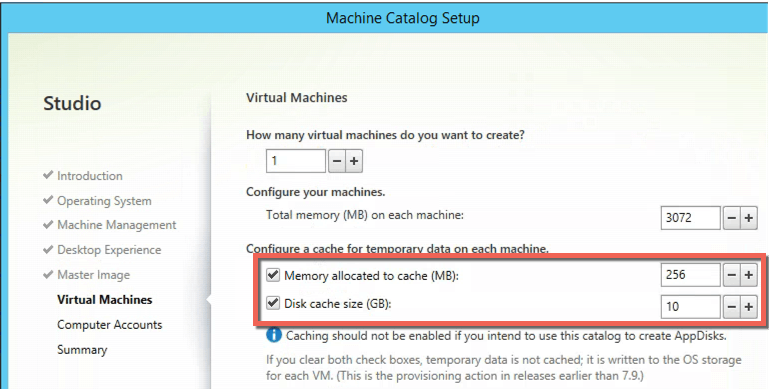
Here you can see you can specify the RAM cache size and Disk cache size.
Note: if you do choose shared storage for the temporary cache, you’ll find this temporary disk stored in the same location as the virtual machines disk and configuration.
Note as well, that as this caching removes the write IO from the volume, AppDisk doesn’t work well here if you’re trying to capture applications but their files are in RAM!
Again, remember, don’t do silly stuff:
- If you want RAM and don’t like bluescreens of death, also enable the disk cache
- Size your disk cache to at least free space + pagefile, or your system will crash if the disk fills up:
Reviewing the new features:
Once you’ve created your catalog and added the desktops to the a delivery group, it’s play time!
Temporary cache disk:
Upon logging into the desktop, you’ll find that you have an unmounted disk the same size as the temporary disk you assigned it, you guessed it, there’s your caching disk:
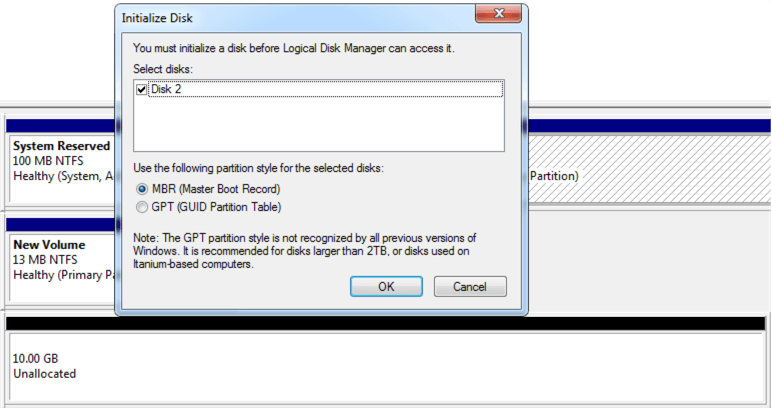
Note: don’t try to initialise the disk or format it, bad things happen!
TEMPORARY RAM Cache:
The RAM cache itself was less visible on first inspection.
Knowing Citrix the way I thought I did, I fired up PoolMon and had a dig around in the Non Paged category and there it was in all its glory:
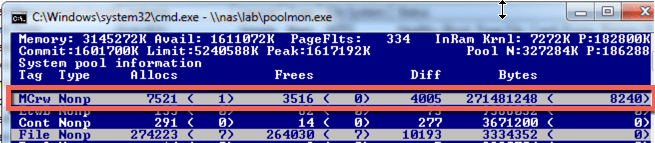
It was at this point, I found the performance counters Citrix added for the cache and felt very foolish!
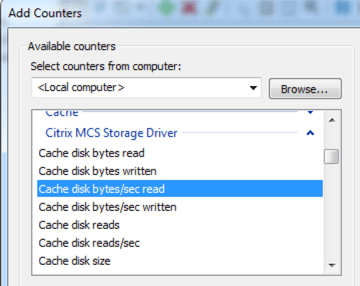
Performance counters:
In Performance Monitor, Citrix have done a great job (Thanks Citrix!) of adding some great counters showing the performance, throughput and usage of the base disk, cache disk and RAM cache all in one place! And the best bit? It’s not in WMI!
How does the cache work:
Looking at the following counters, you can see the total available cache and the current memory in use by the cache:
• Cache Memory used
• Cache Memory Target size
With these counters being displayed on the screen, I began testing to see how this technology behaves:
Logic in the RAM cache:
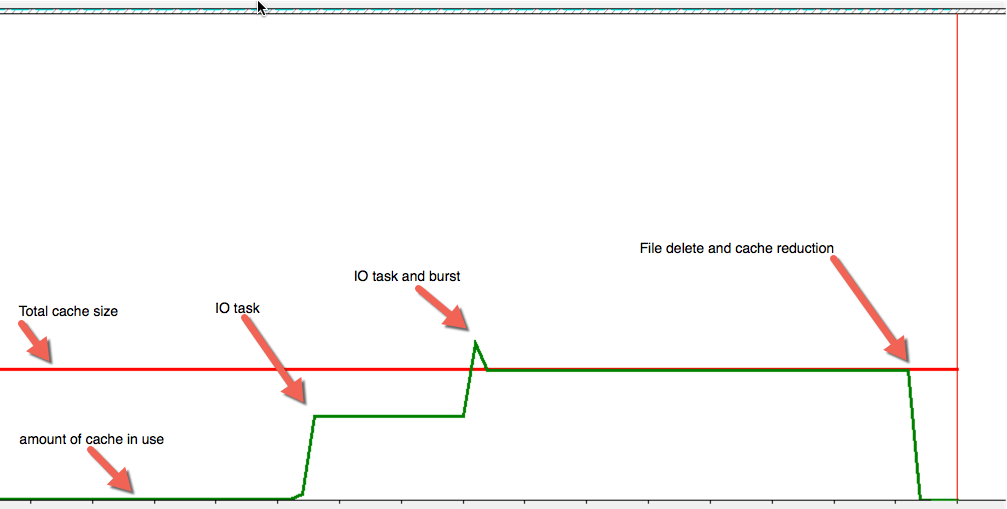
- I performed a file copy to occupy some space
- I then performed a file copy larger than the space available in cache.
- Once lines moved the way I expected, I performed a delete operation and the cache usage reduced!
So that’s pretty cool, what we can tell straight away is:
- The RAM cache can and will burst up and overshoot the maximum ram configured at times to up to 50% and always less than roughly 75% of overall system RAM.
- The Cache is first in, first out. And will remove data from the start of the cache as soon as it fills.
And what happens if I copy in more data to a device running the ram cache without a cache disk?

¯_(ツ)_/¯
Hence my warning, don’t do RAM cache alone, it’s not a good idea… anyway, let’s throw the disk into the mix!
Logic with RAM and Disk Cache:

This time I performed a file copy much larger than the RAM cache size to see the impact on the disk. From this exercise
- The RAM cache is the first port of call for all IO.
- Once the RAM cache saturates, it begins to dump its contents to the disk
- As space is freed in RAM, the file copy begins to fill that space.
- This continues and spiking happens (and mentioned why in previous section) throughout the file copy
- Once the file copy is complete, RAM stays full.
- Once I then deleted the file, both the size of the disk cache and the ram cache greatly reduced.
Ok so that’s how it works!
But what about performance?
So firing up IOMeter and using the tried and trusted Desktop virtualisation workload as recommended from Atlantis computing I tested my meagre home lab on a base image without RAM cache:
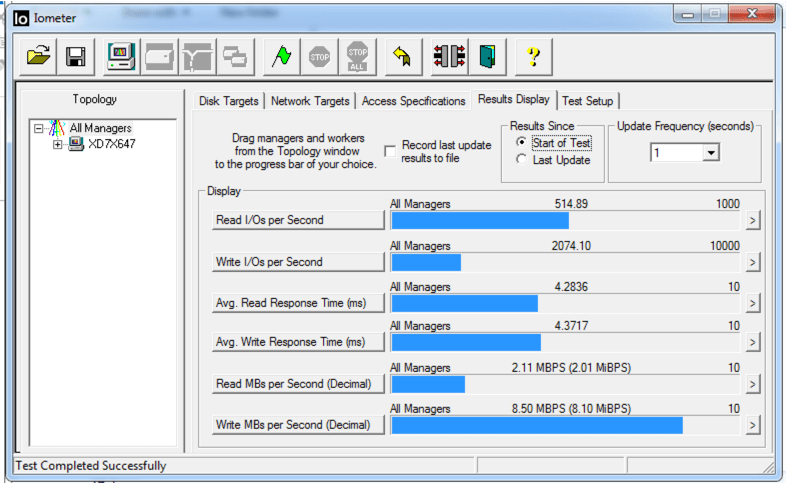
When the IOMeter is working with a file smaller than the size of the RAM cache, the results are astounding:
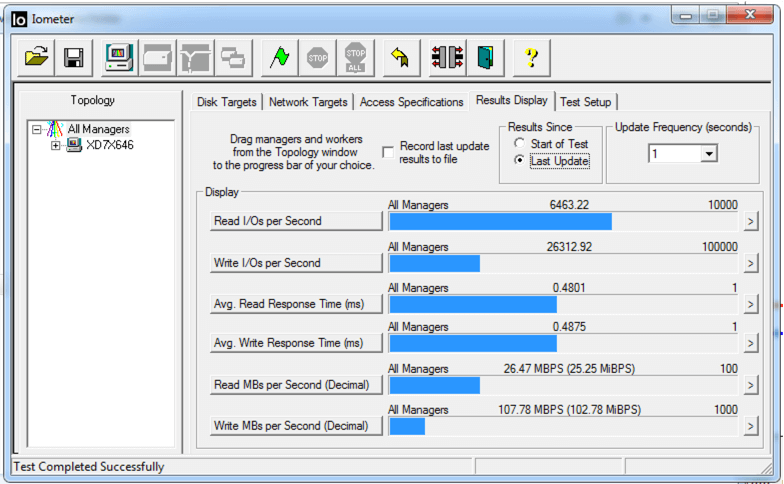
Sadly, when the IOMeter file is greater than the size of the cache (256 mb cache, 1gb IOMeter file). The results are very negative:
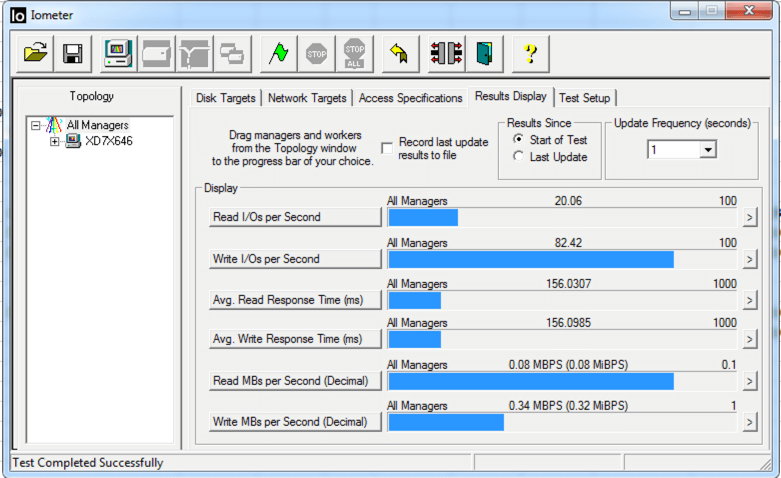
Unfortunately, this is in line with the same negative impact that the Citrix Provisioning Services driver has when it’s overloaded, if anything it’s a bit worse.
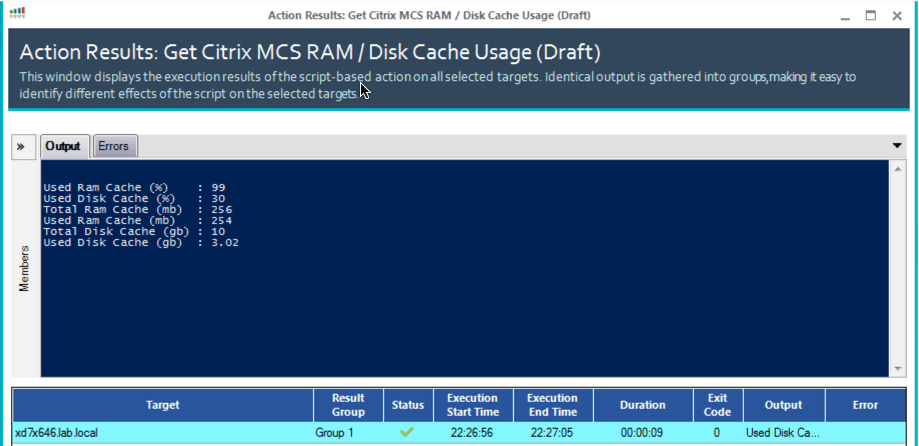
New Script based action:
So the beauty of working with ControlUp, or being a ControlUp customer is, with “script based actions” you don’t need to wait for the monitoring vendor to investigate and develop solutions. Instead, with a little bit of tinkering you can create a script based action to get the data you need!
Wouldn’t it be great if you could run a command to see how much cache is in use in your environment on your newly provisioned MCS desktops with RAM and Disk cache?
I thought so too!
Coming to a ControlUp console near you soon! I present the “get Citrix MCS RAM / Disk Cache usage” script based action!
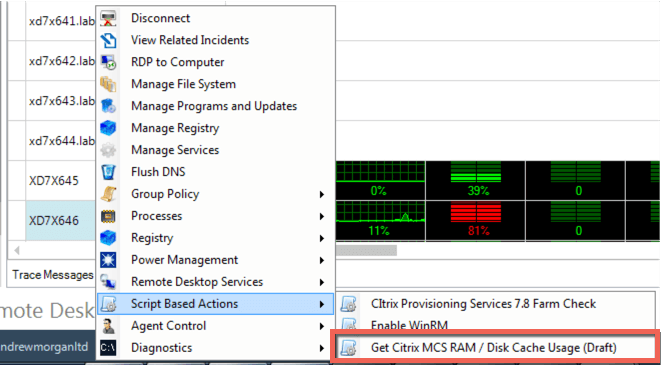
This script based action will allow you to quickly and easily view the cache usage on your target machines as below:
Wrap up:
Citrix MCS IO caching is a welcomed feature to the MCS provisioning platform. It’s relatively easy to setup but there are some pitfalls around configuration and performance.
Still, for a 1.0 product, with performance counters baked in, it’s a really good effort from Citrix and I’m sure it’s going to raise some real interest for Citrix customers.
Remember:
- Always combine RAM with Disk If you hope to use RAM.
- Size the Disk for at least free space + pagefile size.
- Spare time and thought for performance load testing!
Thanks for taking the time to read my latest blog post and I hope you enjoyed the deep dive! Until next time, happy virtualising!
A big thank you to Juan Rivera, Sheldon Lachambre and Alton Taylor in Citrix for their insights and time while creating this blog post.