
Welcome to our new blog series, Unleashing the API!
In this series, we will explore creative ways to leverage our APIs and data, showcasing innovative possibilities for integration and automation. The goal is not to provide fully built solutions but to inspire you with ideas, best practices, and practical examples. Use these insights as a starting point to develop your own custom solutions, tailoring our examples and tips to fit your specific needs. Let’s dive in and see what’s possible!

OutSystems
In this first blog of the series, we are building a mobile application using data from our Desktop API within OutSystems.
OutSystems is a low-code development platform designed to create enterprise-grade applications. It is especially well-suited for quickly and efficiently building mobile, tablet, and reactive web applications.
For this example, I decided to build a mobile inventory app to track and manage the devices in my lab. The API endpoints used in this project include:
- List Devices – Retrieves all available devices and their data.
- Run an Action (Single) – Executes an action on a specific device. In this example, I use it to send a reboot command.
This setup lets us view device data and take actions directly from the mobile app, demonstrating the flexibility of integrating ControlUp’s API with OutSystems.
To showcase the functionality of the mobile app, I created the following video demo:
Use case
Making a mobile app available to your helpdesk and system administrators can be extremely useful when not at their workstations. The ability to reboot a computer or log off a session directly from a mobile phone enhances their ability to support end users more efficiently.
While our website is accessible on mobile devices, this solution gives you complete control over the layout and functionality. You can tailor the interface to focus on the most relevant information and hide unnecessary details, creating a more streamlined and efficient experience.
If you already have OutSystems licenses and are a ControlUp customer, this can be an easy solution to implement. The example demonstrated in this blog took only a few hours to build.
Tips:
The default OutSystems API integration does not support Bearer tokens. However, you can easily resolve this by adding an Authorization input parameter to the API call.
Ensure the parameter is sent in the header and set log redaction to yes. This ensures that the Bearer token does not appear in plain text in the module log within the OutSystems Service Center.
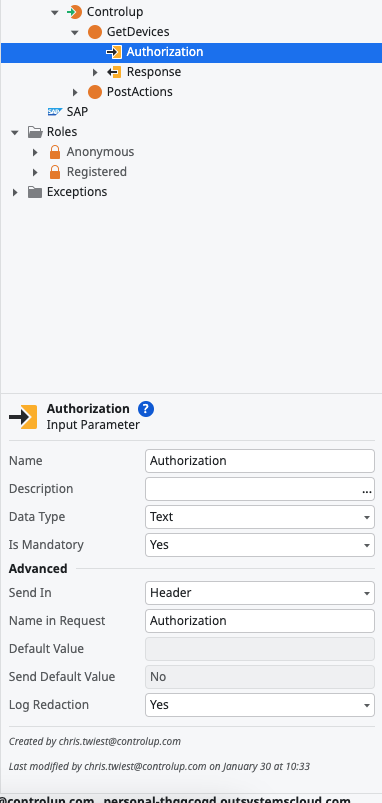
When setting up the logic for the API call, you will be prompted to enter the Authorization parameter. Here, you can enter “Bearer YOUR_API_KEY” to authenticate the request.
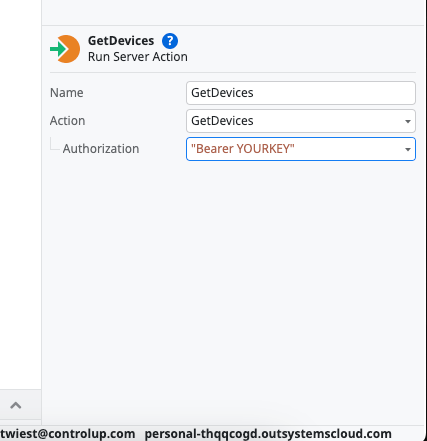
And this is how it appears in the Express Editor:

The next tip concerns the POST command. Our documentation shows that the POST command requires a body to be sent with the request. In this case, the body should include a type set to DEV_REBOOT in JSON format.

You can use the JSON Deserialize task in your API logic to generate the request’s input body. This ensures the data is correctly formatted before sending it in the API call.
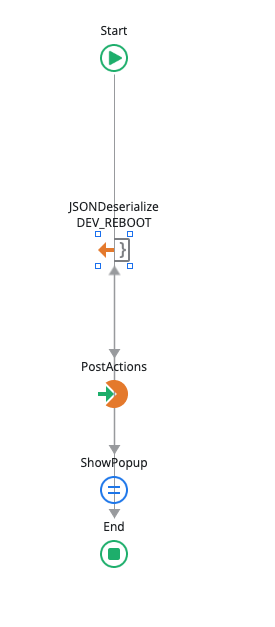
In the Express Editor, you can enter your JSON body as follows:
“{“”type””:””DEV_REBOOT””}”
This ensures the correct format for the API request body.

Here are 3 more tips to consider when building an OutSystems App with ControlUp API:
- Use timers to automate data retrieval
If you need to fetch data from ControlUp’s API at regular intervals, use OutSystems timers instead of manual actions. For example, a timer can periodically update device status, keeping data current without user intervention. - Reduce API calls with local caching
Caching frequently accessed data in a local entity or session variable minimizes unnecessary API requests. Refresh the data only when needed to improve performance and avoid hitting API rate limits. - Handle large data sets with pagination
For APIs returning large amounts of data, use paging by dynamically adjusting the _page and _limit parameters. This ensures efficient data retrieval and prevents performance issues.
OutSystems Mentorship
I want to thank the OutSystems Mentorship Program for their support in creating this demonstration. A special thanks to Negin Nafissi (RawWorks), whose guidance was essential in making this demo work quickly and efficiently.
If you seek expert advice on OutSystems, you can book a free consultation with Negin through ADP List: https://adplist.org/mentors/negin-nafissi.
Conclusion
I hope this blog has inspired you to create your own unique solutions using our APIs and data. If you have any questions or ideas, you’d like me to explore in this series, please reach out at Chris.Twiest@ControlUp.com. I’m always happy to discuss new possibilities!